
This is something I’ve been working on for a while. A way to passively and accurately monitor my utility usage. It would need to be able to tie into my existing home automation infrastructure and poll at a regular enough interval to be useful. From (passively) digging around my meters and reading up on solutions others have used, I settle on a couple of approaches. Firstly, it appears that in my area my meters advertise their data on the regular for easy consumption by electrical companies. This information is advertised by my gas, water and electric meters unencrypted and is too useful to pass up. It also allows me to read this passively to avoid interfering with my meters. The cost for this would be a simple RTL-SDR Receiver. As a quick disclaimer, interfering with your meters in any way can lead to a fine, so please avoid that. I have seen some alternative approaches involving installing simple cameras that watch the meters dials and while this is ‘technically’ passive, probably wouldn’t appear that way to anyone that asks to physically look at your meters should they come knocking.
Ok, so this covers the holistic utilities, but what about granularity?! For example, What if I want to know for what is drawing power and where at a given moment? For this, I settled on something that is still ‘technically’ passive but not for those afraid to crack open that MCB cabinet. As you might have noticed from this sites logo, I’m a fan of ESP32 devices, they are dirt cheap, easy to set up and almost as easy to write code for. They also integrate very well with Home Assistant. There also exists a very cool addon board compatible with these chips that allows you read in as many circuits as you need from your MCB. You can read about it (here)[https://github.com/CircuitSetup/Expandable-6-Channel-ESP32-Energy-Meter]. Note: Be sure to read this documentation thoroughly before attempting any install, you’re playing with electricity here! If you’re not comfortable with that, you proabably need an electrician. Fortunately for me, I have electrocuted myself enough in the past to be okay with risking another shock.
The hardware
For the SDR, I opted for a cheap and cheerful NooElec NESDR. It’s USB format would allow me to use it within my k8s cluster and set up my workflow to run as a deployment on the cluster along with everything else. For the Circuit monitoring, I purchased an ESP32, a main board as well as the associated 9V AC Power adapter and additional 6 channel addon board. This got me a good start of 12 channels to play with. Along with this, I was going to need Current transformers for all the circuits I wanted to monitor. These range in supported amperage and depends on the circuits you will want to monitor.
The Software
For the SDR side of this, It looks like someone has already covered the tricky part, finding your meters in the wild and collecting it in a way that makes sense! You can read about that here. This project, written in Golang, provides a means to target specific meter IDs from all of the meters and their respective protocols that your SDR is likely going to pick up. Don’t forget, this is just a radio and your neighbours have meters too! Once I had my SDR device and plugged it into the target k8s node, I set up a first pass deployment. This first run, just deploying straight k8s resources as no helm chart exists for this tooling (yet).
I also provisioned a simple custom container image here for this code, as a reliable one didn’t exist. This image builds on top of a golang base image and simple builds the required binaries. As a note, this tooling is broken into two packages by its developer, one which handles the SDR side of things and another that handles the data collection. In the future if I decide to make a helm chart for this, I will probably fork this code relocate this responsbility to a metrics export for prometheus. This will let me drop the influxDB dependency too. You can see the rough deployment of this all here. For the moment, mounting the SDR usb device and setting the necessary env vars to target the data collection to my separately deployed influx database.
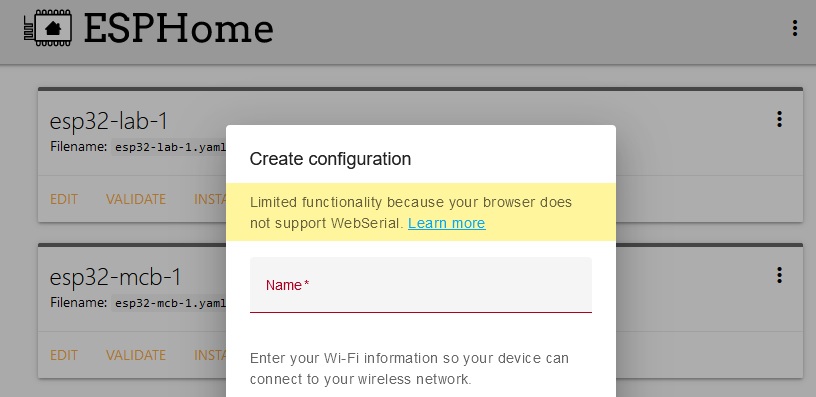
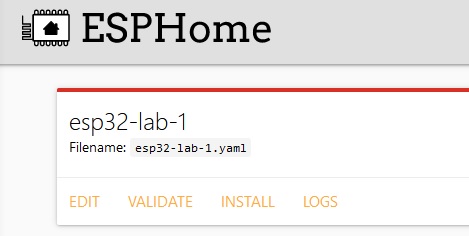
For the circuit monitoring side, the example code to run on youe ESP32 is available here in the repo I linked earlier. If you aren’t familiar with ESP devices, there are plenty of documents in the wild that cover them. How I do it is via ESPHome. This is a framework for ESP8266/32 devices that allow for easy management and control of ESP devices in your Home. It provides libraries to provision components that will natively be availbale to things my Home Assistant. ESPHome can be added as an addon to Home assistant or run independently. The basic flow for a net new ESP device via ESPHome is:
- Add a device entry for your new ESP device in ESPHome. Be sure to add accurate WIFI Settings. It will provision a config manifest for the device with some sane defaults.
-
I would recommend setting up some secrets to secure the device. Most importantly, an API and OTA key, this should deter any nefarious passers-by from reflashing.
-
Set up any other required code here as needed, you can reference the circuitsetup example. For your first flash, I would recommend sticking with basics.
-
Under your device entry in esphome, Click
Validateto ensure your formatting is correct, then clickInstall.
-
It should present you with a prompt to select how you want to install. For the first install, you will need to do it locally via USB. If you select
Manual Download, it will generate a binary file with your config manifest and download it local to your machine for manual flash. I just use the ESP Flash download tool for this. Simply boot your ESP32 into flash mode and select your file. After you do this the first time, future flashes can be done via the ESPHome UI. -
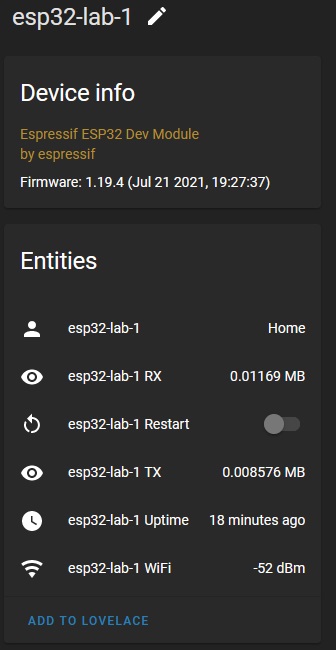
If you use Home Assistant, you can add the ESP32 by adding a new
ESPHomeintegration and entering the requested details. It will look for the ESP32’s IP and API Key. If all went well, you should have your device in Home assistant and any defined sensors. It provisions some default uptime and Connections sensors as well a usefulRestartswitch, to gracefully reboot the ESP32.
The Electrocution
Ok, I managed to get away with NOT electrocuting myself. Here are some shots of the ESP32 install. I do still have some cleanup to do here. Which will happen when my additional addon board and current transformers arrive.
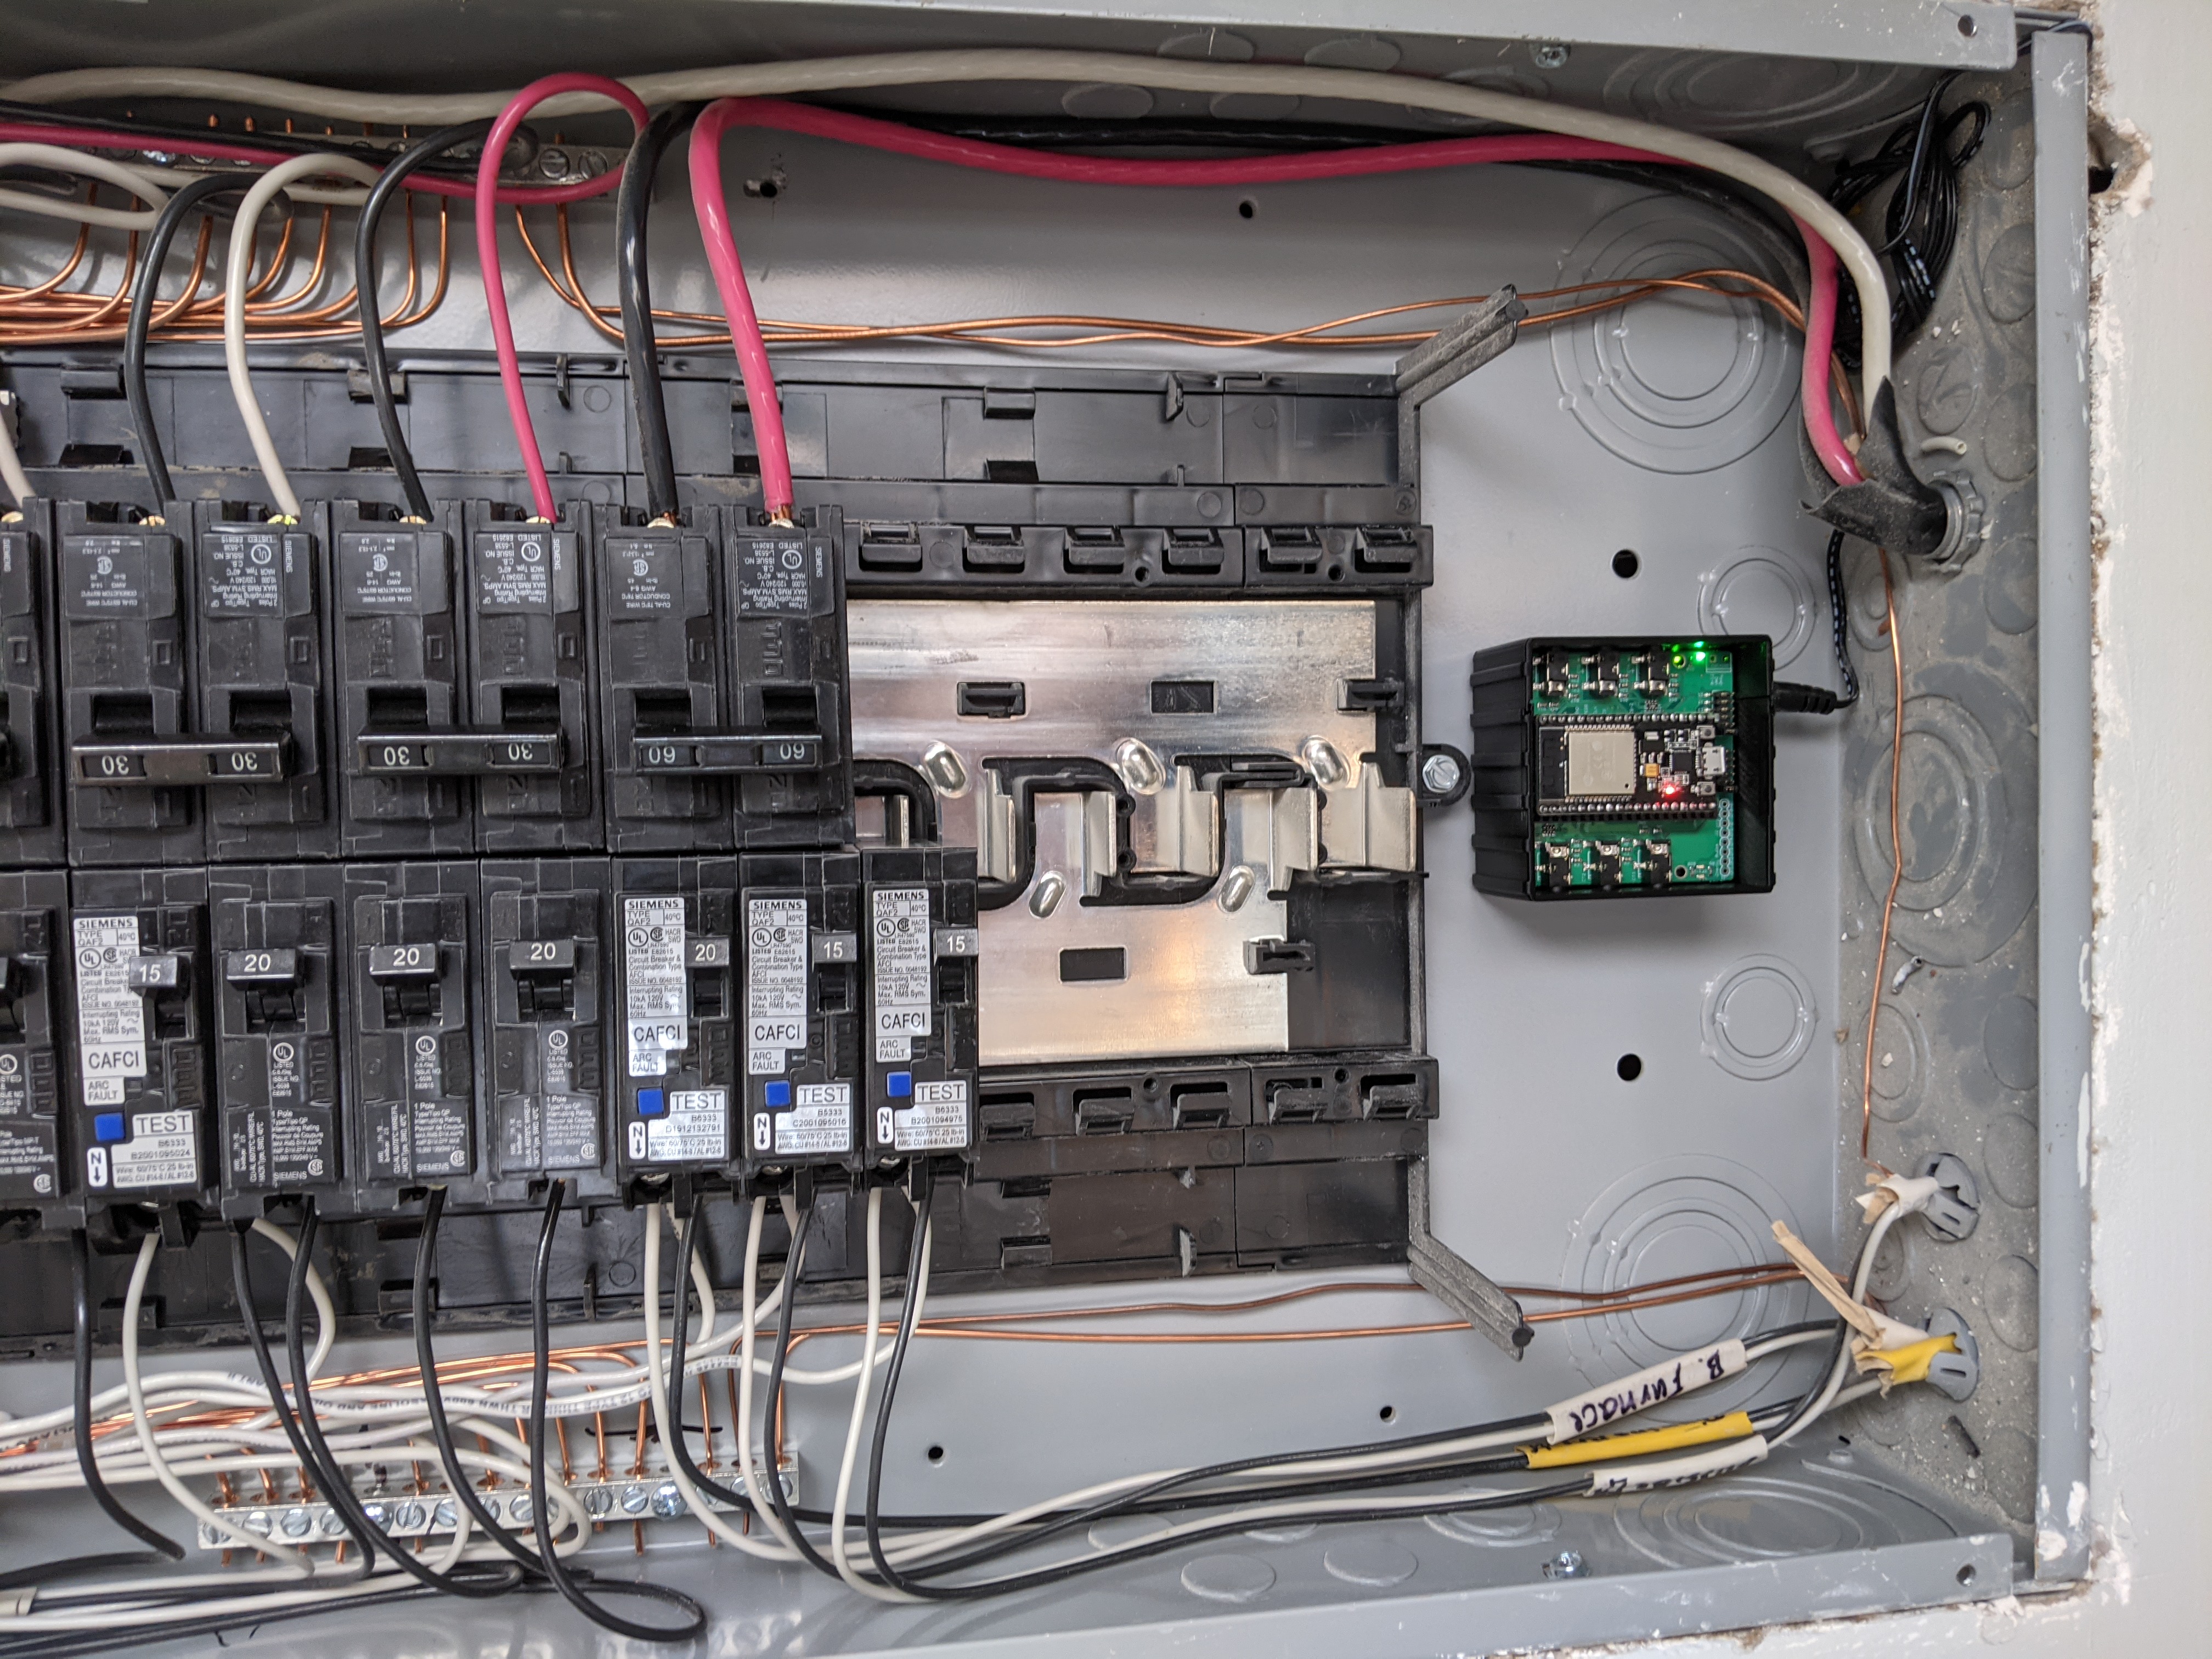
I got lucky with my MCB cabinet, the electrical wiring was immaculate and allowed plenty of room for the ESP32 to install below. Ideally, if you are installing this though, I would recommend outside the MCB. While it didn’t affect me, The case interferes with the wireless signal and is most definitely not a hospitable environment for it.
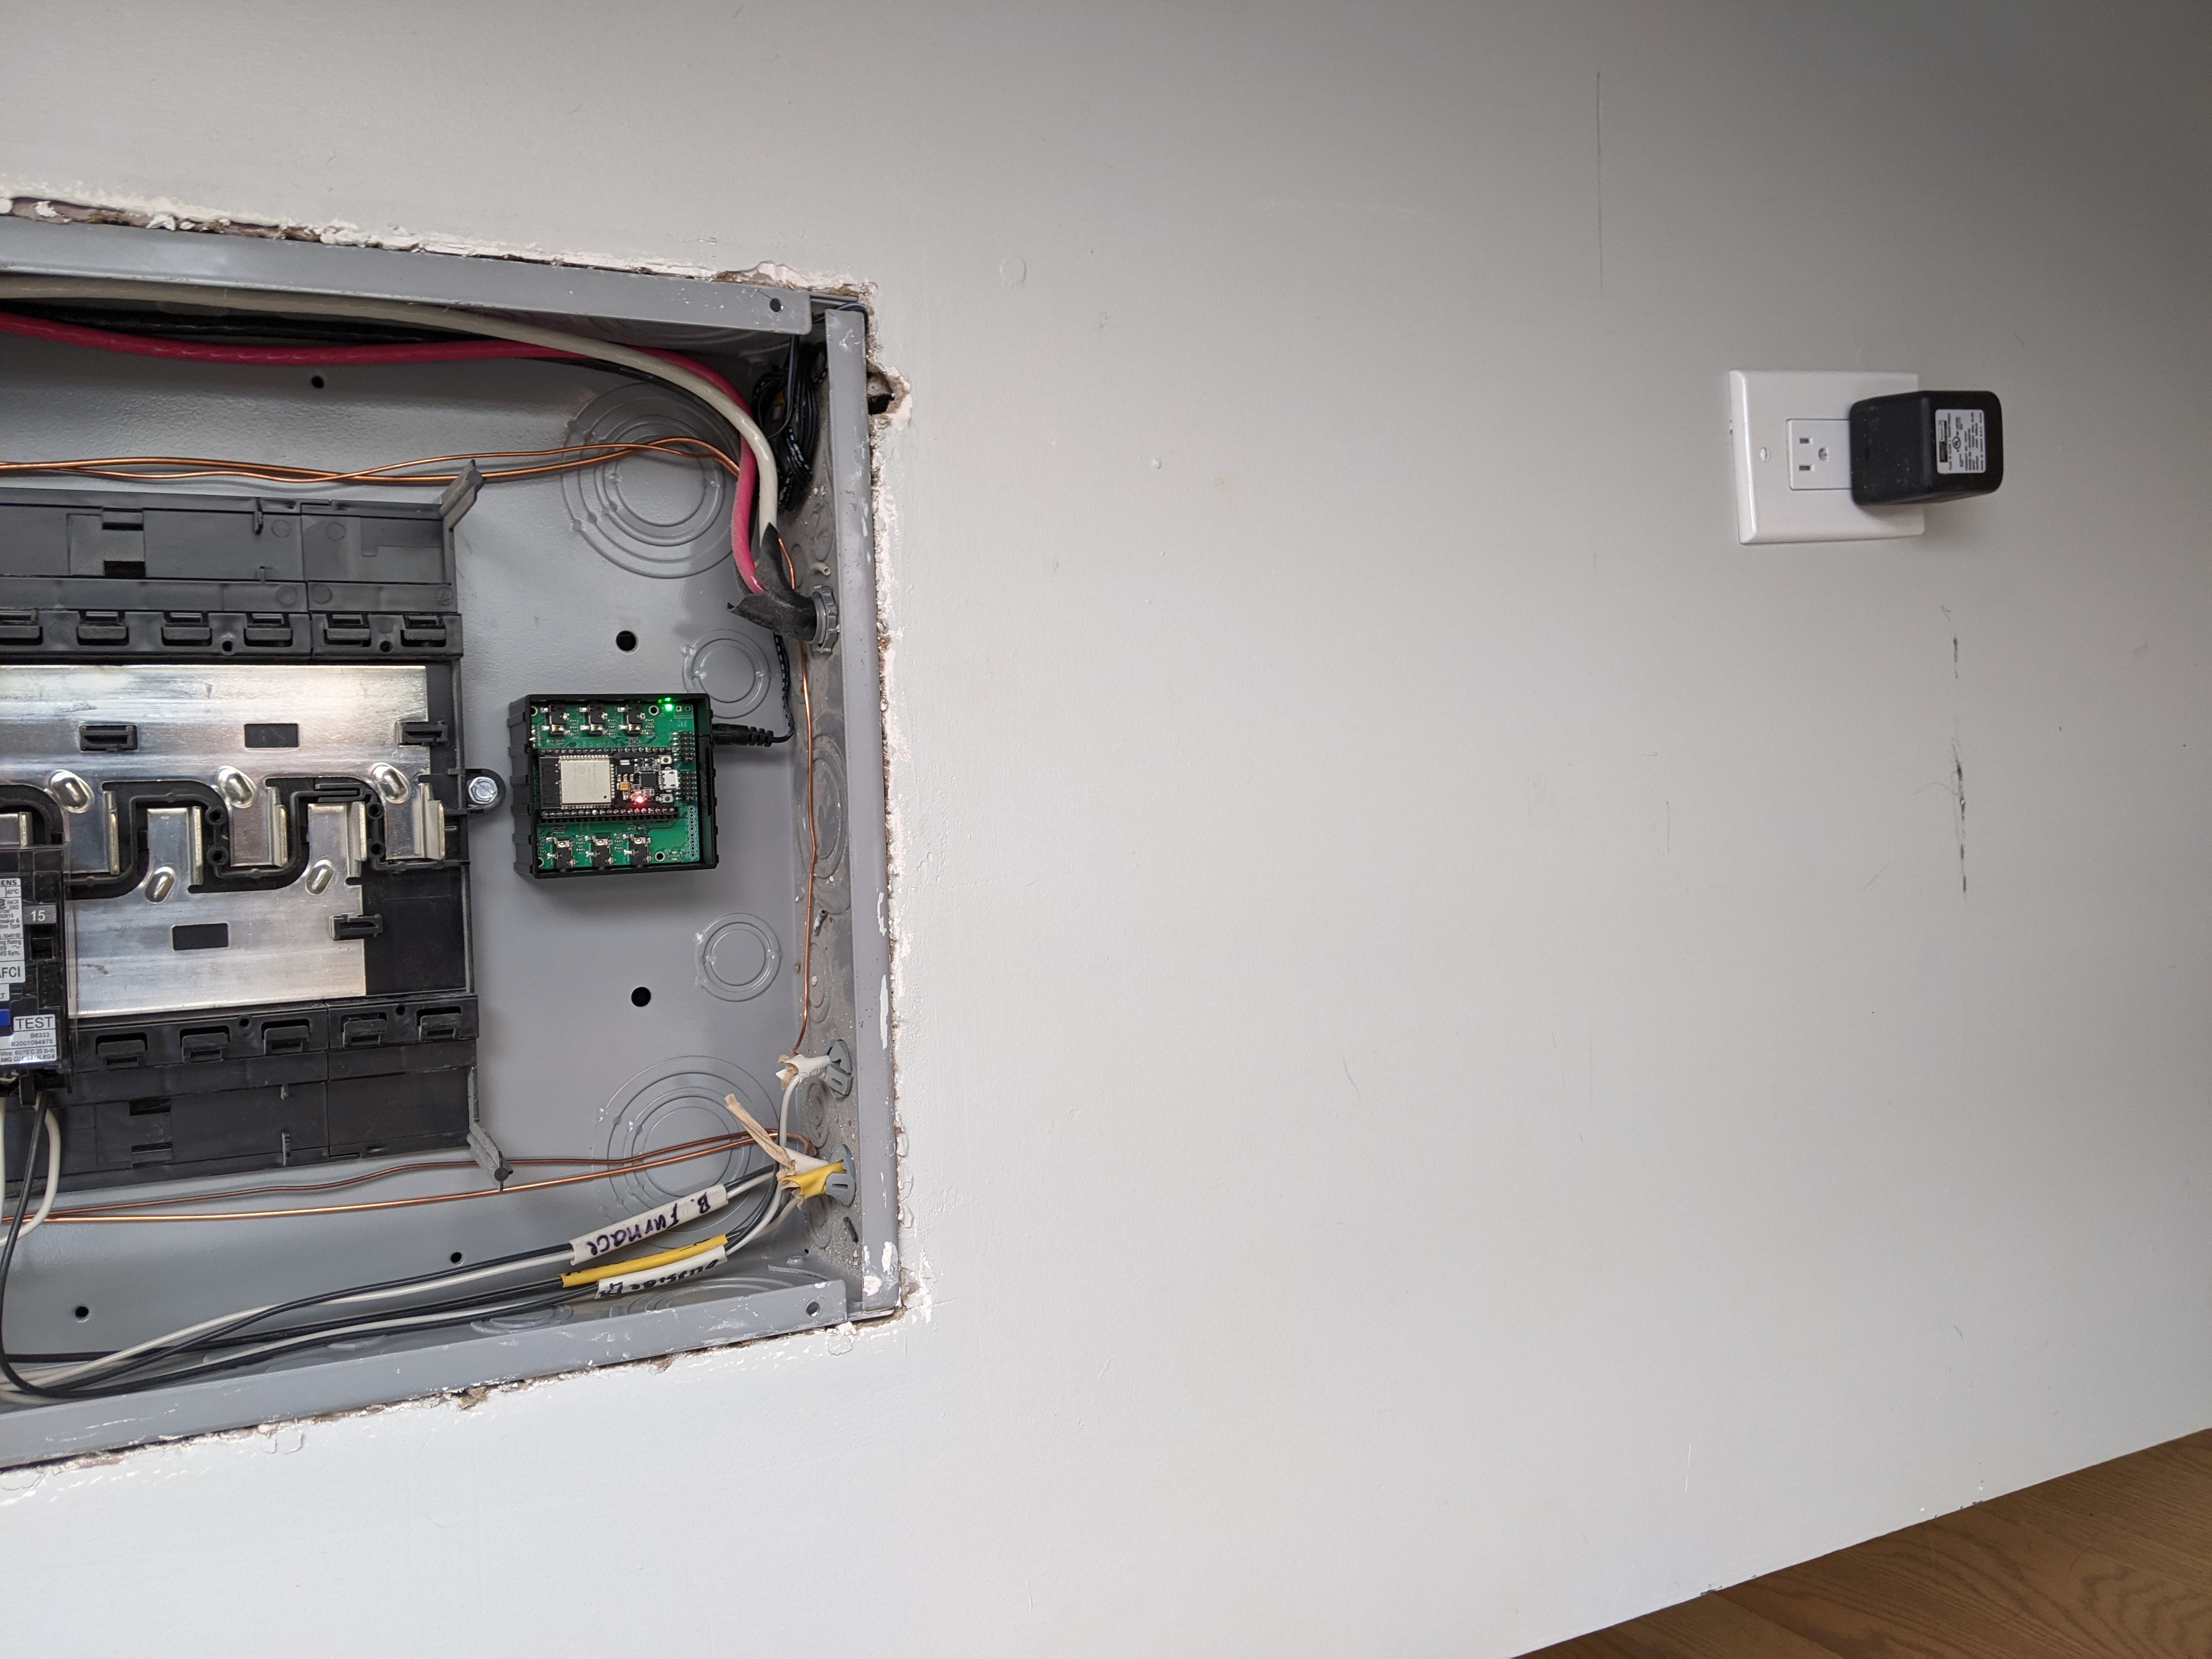
I opted to route my power supply for the unit to a socket directly below the cabinet itself, which turned out pretty clean.
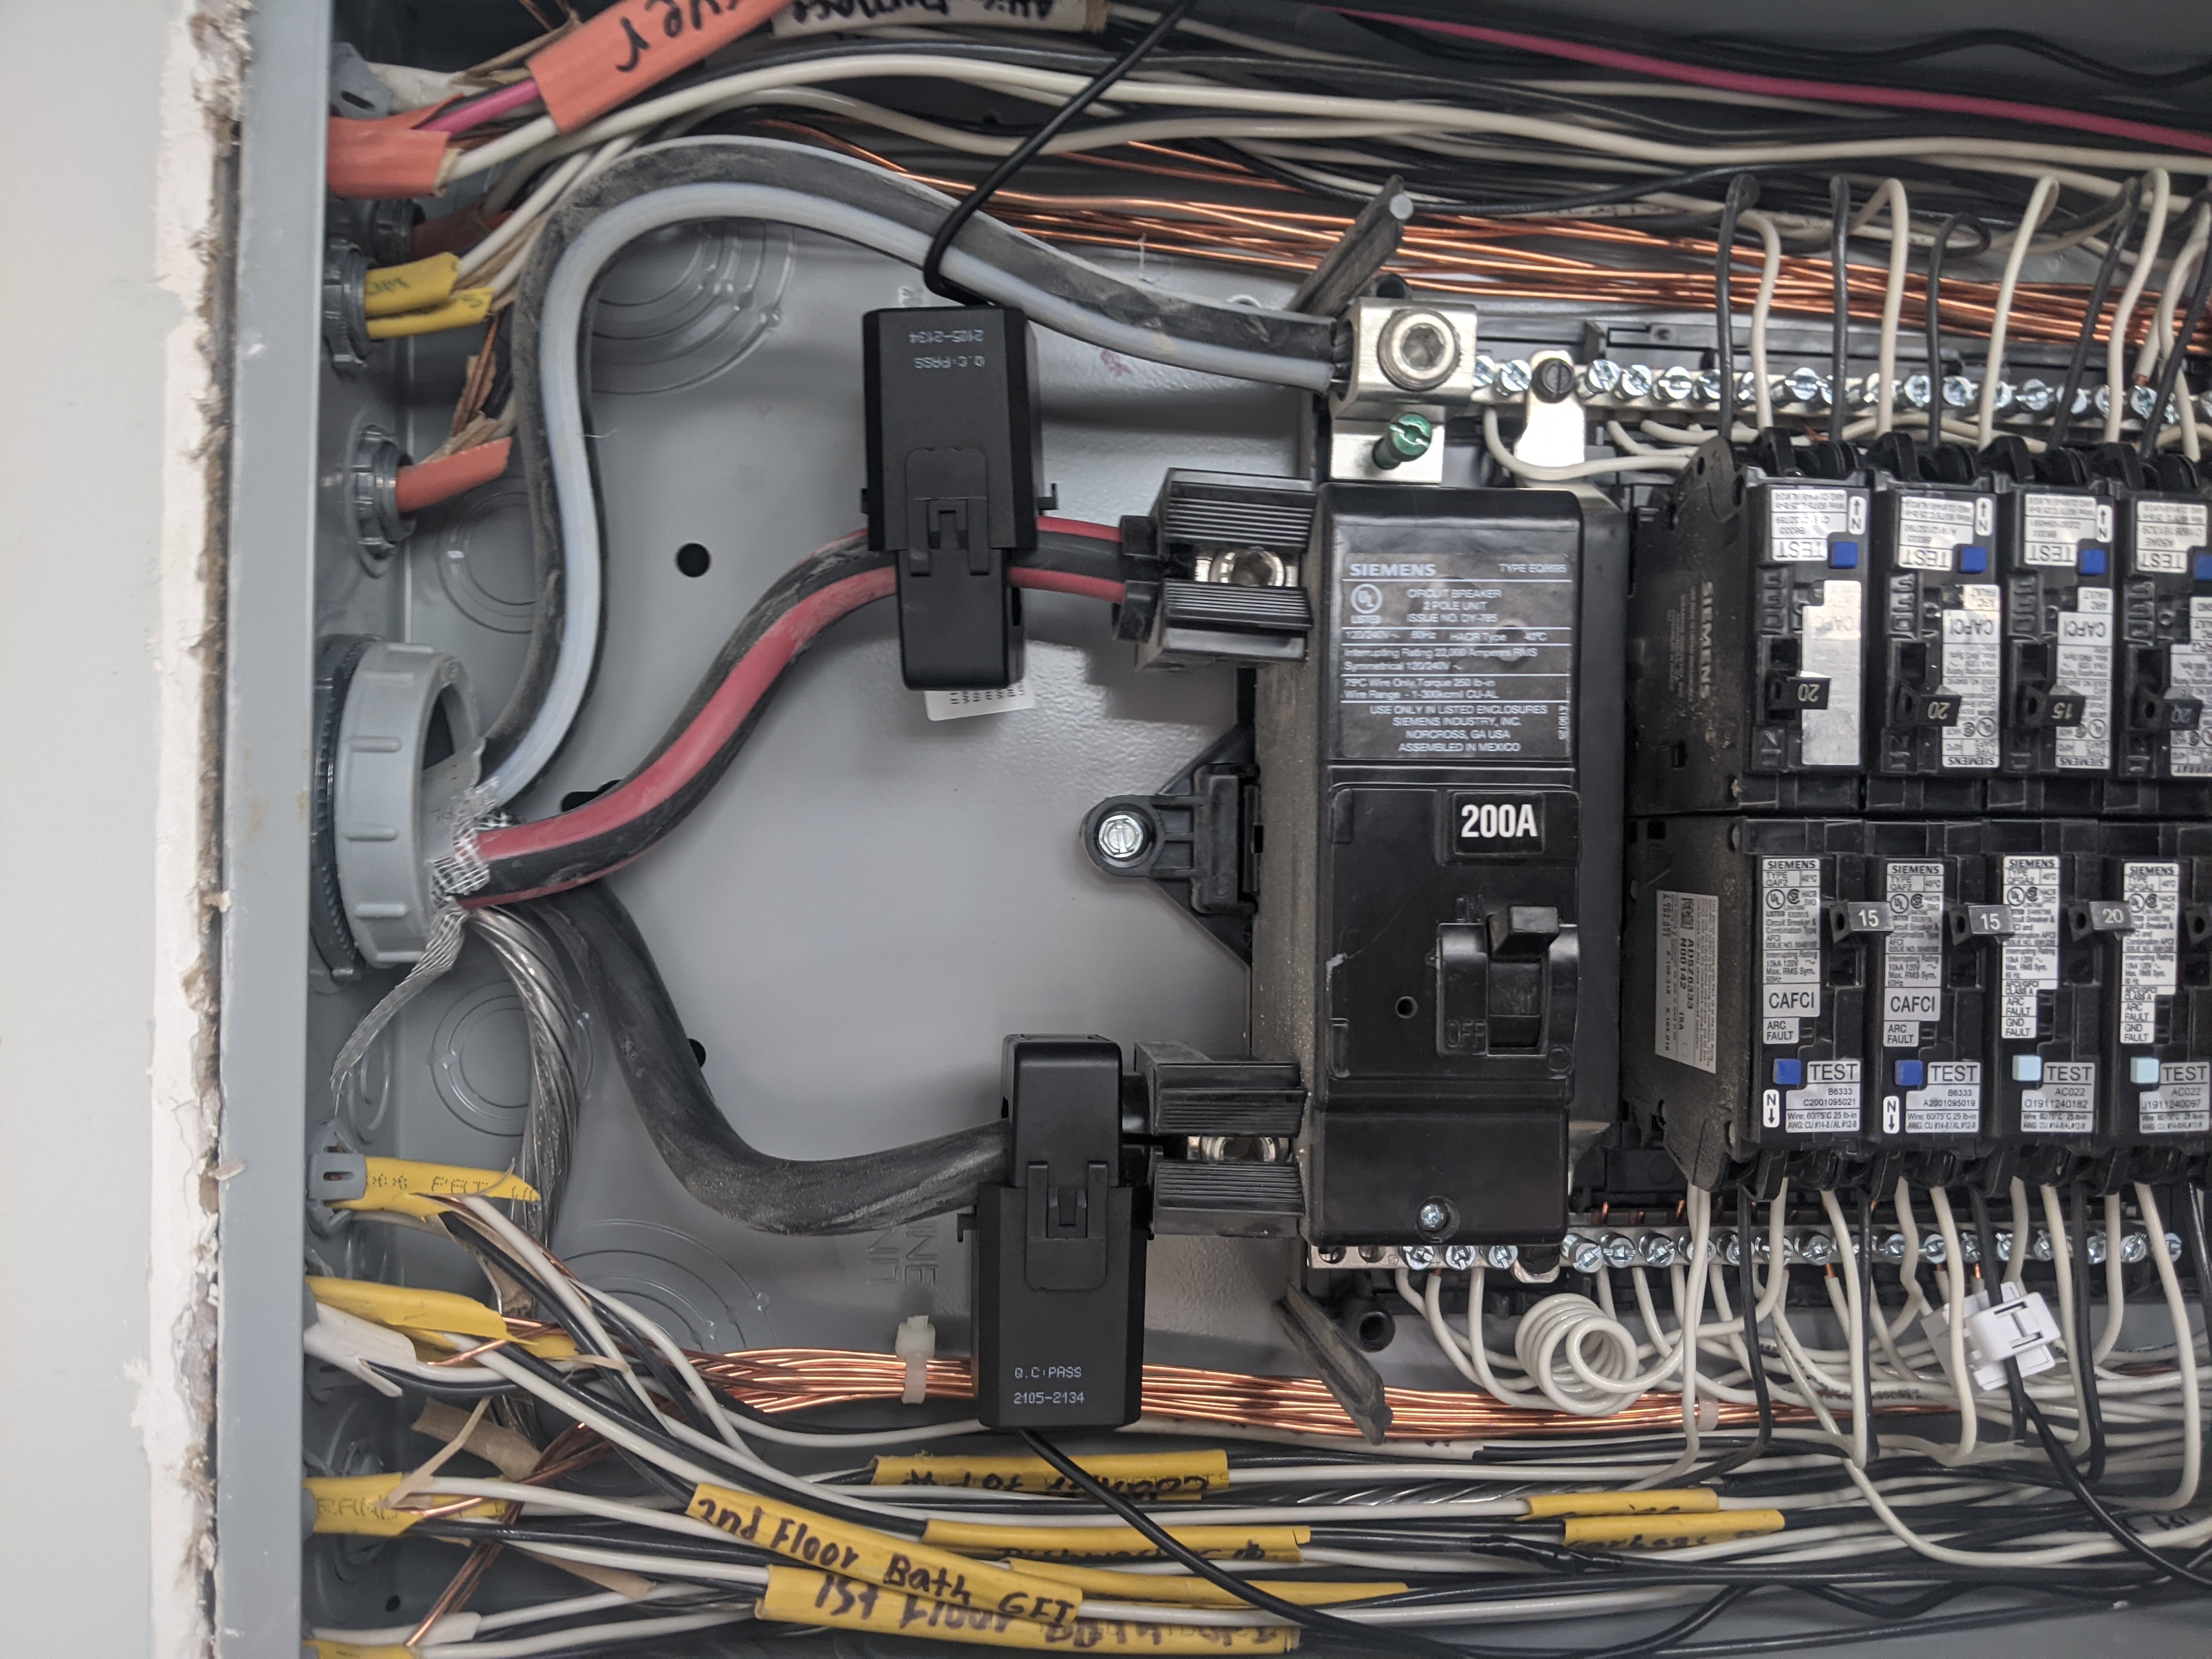
The current transformers have a particular orientation, so be aware of that. Also reminder to be VERY careful inside the cabinet. If you don’t know what you’re doing, you definitely shouldn’t be in here. In the case of this image, these clamps are wrapping around the 200A main feed and is EXTREMELY dangerous interfere with.

The cabinet with some additional current transformers installed and working (albeit in need of some cleanup!). The end result so far is 10 channels being monitored reliably. The ESP32 registers sensors for each of these channels under the device in Home Assistant, which in turn has been set up to export the sensors I care about as metrics to prometheus for use in Grafana. The SDRs InfluxDB database is also set up as a datasource in Grafana too.

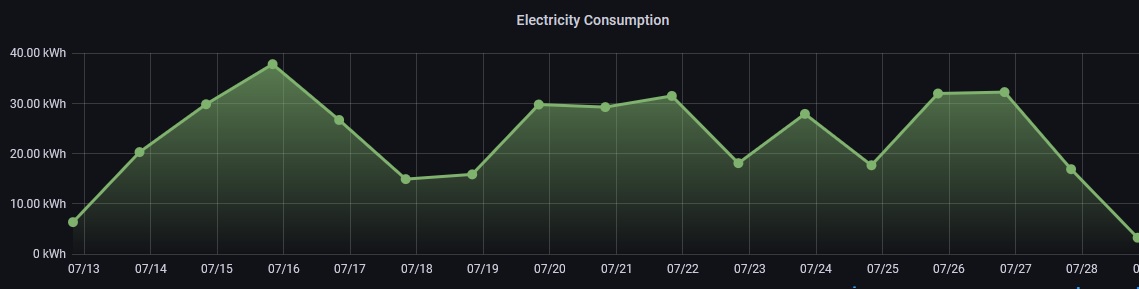
I do still need to do some work on the visualization of this data, but here are some shots of the data in Grafana. The ESP32 data is set to refresh at a 60 second interval and does so pretty reliably. The SDR isn’t so reliable but does work, with a refresh interval of ~5-10 minutes. Ultimately, I plan on using these in different ways. The the SDR data as a means to validate the overall numbers for electricity, as well as deviations from trend in our Gas and Water consumption. Example: f we’re on holiday and the gas/water spikes, Home assistant can alert us and automatically switch off main valves. The ESP32, being more pointed and real time, will let me track specific device power usage and circuit state for a whole bunch of things. E.g. Device usage in specific rooms can be another factor of evidence a room is occupied. This setup has been running for about a month without issue. There is obviously still lots to do but great progress so far!